s The Kim Six Fix
What is New?

FEATURED POSTS


DIY & Woodworking

Crafts & Holidays

Tips & Tricks

Hamptons Inspired Bathroom Makeover

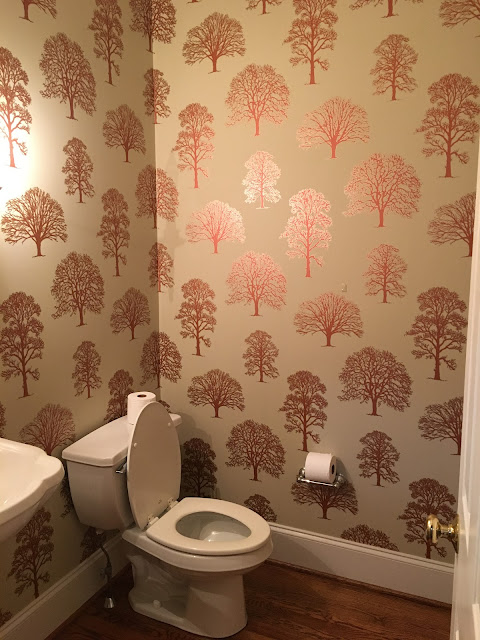
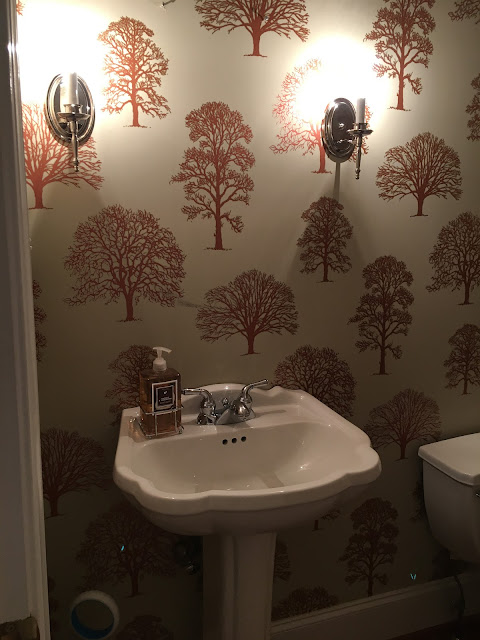
Our new house has a powder room that was wallpapered within an inch of its life when we bought the house, so I decided it needed a makeover.   

The wallpaper was actually METALLIC and shined in the light. Which was cool, but the copper color wasn't really in my color scheme.


Not to mention,  it had no mirror and some really old fashioned colonial style sconces.  Whut? 

PLUS A SEASHELL SINK. OMG NO. Since my style isn't south Florida meets George Washington, it was on my list of crap to change as soon as we moved in.

Our new house has a color theme of navy, blue and turquoise with a touch of Hamptons/Nautical and a touch of Farmhouse.  Nothing too rustic and nothing to themey.. so this was my vision of the bathroom.

We toured a house when we were house hunting that had the most amazing bathroom with a single tiled 'accent' wall and I knew I wanted to do that behind the sink and toilet.

The walls got damaged pretty badly getting the wallpaper off, so I didn't want to paint.  I decided I would need to re-wallpaper. 

So here is the vision: 


Navy and white, to go with the rest of the house's color scheme.  I also have used a lot of chrome in the house, so I decided to stick with silver accents instead of the currently trendy brushed gold.  

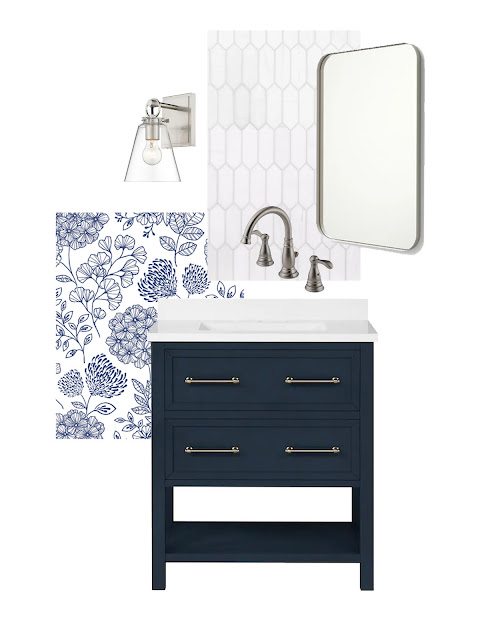
So far, I've purchased the vanity, wall paper, faucet and tile.  And so I'm going to record those costs here and just update the budget as we go along.

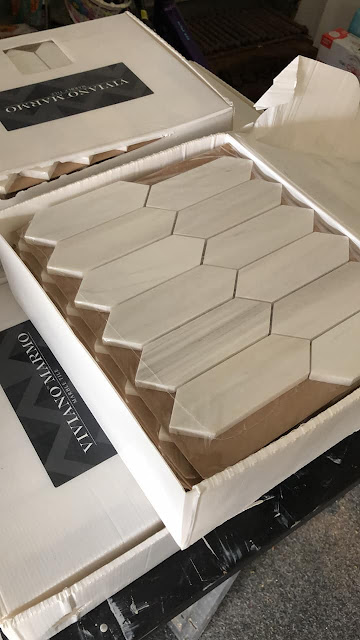
Tile: $997 (60 square feet plus thinset)


Vanity: $447
Delta Faucet: $82 (I got a refurb on clearance)
Wallpaper: $324
Total spent so far: $1850

I have the sconces and the mirror in my shopping basket but haven't pulled the trigger yet.


My Three Year Hiatus: The State of Blogging in 2022.


Wow.  This feels so strange.  I almost forgot my blog's password it has been so long.

Yes.. It's been 3 years since I've published a post.  I can't believe it.  I logged in and the last post popped up from October of 2019.  TWO THOUSAND AND NINETEEN?

What?!

That was before Covid.  

That was right around my move back to the East Coast.  

Before my new house.

I stepped away from my blogger life to launch a needlework shop that has taken off in ways I have never imagined. 

I was tired of blogging. It was a huge rat race. It was SEO and perfect photography and social media and all sorts of bullshit that I just didn't like. It sucked. I had known it had sucked for a while, but I was earning my living off ad revenue and sponsored posts so I keep on plugging along. 

Until I didn't have to anymore.

And I didn't miss it. Not one bit.

I was doing all these house projects and not needing to document or share them. I could remodel or redecorate and I didn't need a photo of every step or an affiliate link for every item I may have used.  I could just do them.

I would decorate my new mantels for holidays but didn't need 100 photos of 10 angles posted 2 months in advance.  And if I didn't feel like decorating them.. I didn't.  No pressure.


I could power wash my deck and it didn't need to be some article about types of power washers or a tutorial on how to "powerwash natural stone" blah blah blah.


I would hire contractors to do major things to my house since I was no longer in need of "DIY" content that was relatable to readers.  I just needed to fix my house.. like a normal person. 

But I have recently had the craving to keep track of some projects I'm working on.  I think this is just as much for myself as for anyone who still follows the blog.   But I want a way to document my project on some of my larger projects.  To keep track of the budget and to see if it comes together like the vision. 

But it's going to be a fast and loose version of blogging.  Because jumping back in now, in 2022, the 'competitive make money and get eyeballs on your content" part of blogging still sucks.  And now it is WORSE. There is TikTok and videos and influencers and bullshit that I just am not into.  So this is not going to be that. 

You're gonna get a few unstaged snaps with an iPhone.  The text I feel like including, if any.. and my lack of "give a shit" about SEO and optimization.

The way blogging was when I first started.. more than 1000 posts and 13 years ago.  HOLY SHIT.  13 years! 2009. 

My kids were just babies.. now one is in High School.

Things have changed since then, and I don't want to get back on that race to nowhere.  I just want to blog for fun again.  And so that is the new plan! 


How to Stitch a Sieve, Strainer or Splatter Shield

It's time for October's Dollar Store Design Squad challenge and this month we all were challenged to create a fall or halloween theme craft with supplies from the dollar store. 

My entry this month involves cross stitch and embroidery, of course!

Gift Idea for Embroidery & Cross Stitch Lovers


Have a friend or family member that really loves fiber arts, or more specifically embroidery and cross stitch?  Well, today I have the ultimate gift guide for those people.

These are all products I use and recommend, in various price points.  Almost all these items are available on Amazon, which makes shopping a breeze.

Harry Potter Icons Tote Bag (SVG file)

Harry potter svg file icon collageA SVG file featuring all the iconic images from Harry Potter books and movies in the shape of a heart.  She used it on a tote bag, but it could be also be split up and used for countless things!  Recently my daughter was invited to a Harry Potter themed sleep over birthday and wanted a fun bag to bring her stuff. I’ve been working on a cross stitch design featuring all the Harry Potter icons and knew it would be easy to convert the original file into an SVG and that is exactly what I did!
Diy harry potter tote
I love how it turned out, and any individual element would be cute, but combined into a heart is perfection.
A SVG file featuring all the iconic images from Harry Potter books and movies in the shape of a heart.  She used it on a tote bag, but it could be also be split up and used for countless things!

How to Apply HTV to Hats and Visors with the Cricut EasyPress Mini


I've been making hats and visors using my Cricut Maker and HTV (heat transfer vinyl) for a while now and it has always been a tedious process.   The small curved surface makes it impossible to use a traditional heat press, or even my full sized EasyPress and even my iron is too cumbersome with hot spots and a relatively large hot surface area.

Distressed Dollar Store Pumpkins with a Crackle Finish

Distress painted dollar store pumpkins
Day 3 of Dollar Store Pumpkin Week!  We’ve had rope and glitter and today is a simple distressed finish.  The same finish I’ve shared before.  Crackled with wood glue and then distressed with a glaze. Crackle painted
The drastic change for this project is really clear when you put the before and after side by side:
Painted chippy dollar store styrofoam pumpkins

20 Fabulous Fall (Not Specifically Thanksgiving or Halloween) Mantels

20 fall not thanksgiving or halloween mantels
20 Beautiful mantels for fall that are not thanksgiving or halloween


I love fun holiday mantels, but I know not everyone has time to change out their theme every few weeks.  In the early fall, you can put up an autumn inspired mantelscape and it can last all the way until Christmas as long as you don't focus on a Thanksgiving or Halloween theme.

So today I have 20 gorgeous mantel ideas that are GENERIC fall, and NOT a more specific holiday.  No turkeys, no spiderwebs no "Give Thanks" wording.    Just leaves and pumpkins and all around prettiness.
We'll kick it off with Adventure's in Decorating's fall mantel, that was so gorgeous, even Better Homes and Gardens had to feature it:

Easy No Sew Knit Sweater Pumpkins

Three little white sweater pumpkinsEasy No Sew Pumpkins from Old Sweater SleevesThis is a project I’ve seen all over Pinterest and I finally had to throw my hat in the ring and try making my own.  I have actually been holding on to the top half of this sweater for almost a year now.
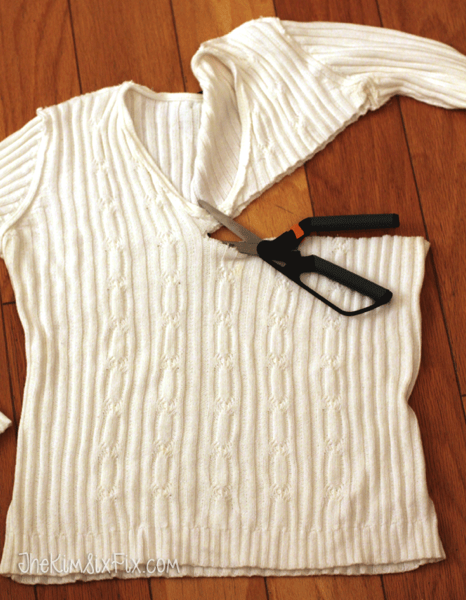
I used the bottom half to make this pillow but I knew I could do something fun with the sleeves. And that is exactly what I did.

DIY Cornhole Boards from Cabinet Doors


Cabinet doors into cornhole boardsHave you ever heard of the game ‘Cornhole’ (also sometimes referred to as Baggo)?  It is basically a bean bag toss game using a pair of angled boards with holes cut in them.   What started as a beer-drinking tailgate game, has become popular for all occasions.
Motion W cornhole bean bag
In fact, a hot new activity to do during the break between weddings and receptions is allow guests to play cornhole.
Cornhole 252 1024x682
Via CharlestonEvent

20 Beautiful Gold Pineapples for Home Decor

Gold Pineapple Decor Ideas I'm kinda obsessed with pineapples these days. These are 20 gorgeous pineapple decor ideas. I want them ALL!! This year’s hot summer trend looks to be pineapples.  They are popping up everywhere, from Anthropologie and Nordstrom to Target and Pottery Barn.

Originally a Victorian symbol of hospitality, the pineapple has recently gotten a glamourous makeover.  No longer relegated to pool floats and luau decor, the pineapple is all grown up.

 I can’t wait to share 20 fabulous gold guided versions that you may want to welcome into your home!

Puzzle Piece Expandable Cutting Boards and Serving Trays

A set of puzzle piece shaped cutting boards that combine together to form one large cutting board, or seperated can be used individually as serving trays with built in wine glass holders.jpg
A set of puzzle piece shaped cutting boards that combine together to form one large cutting board, or seperated can be used individually as serving trays with built in wine glass holdersFor a relatively new woodworker, there aren’t many projects that come out better than you expect. You typically  have a vision, and your final project is close, but never perfect.  This is NOT one of those projects.  I am just so excited with how this set of cutting boards came out, I’m just pleased as punch with it!

It is a set of puzzle shaped mini-cutting boards (I used maple) that assemble together to form one large cutting board:
Puzzle piece cutting and serving boardBut the fun part is that any individual mini-cutting board can be used as a serving tray, and the notch in the puzzle piece shape can be used to hold a wine glass!  ISN’T THAT GENIUS!?
Puzzle cutting board with wine holder


Copyright © 2017 The Kim Six Fix. Proudly Blogging on Blogger