When we moved into this house the previous owners left us this.. uh... well.. uh.. "taste-specific" chandelier in the dining room:
Now to be fair, her house had UBER traditional furniture and so it wasn't as awful is it appears in isolation:
My furniture is not Queen Anne style so I had to do something about this brass jeweled monstrosity:
The pictures of the actual chandelier I have are difficult to see, but I was stumbled upon this photo which is my exact chandelier without the crystals. On mine the center glass globe in shaped like an hour glass and my "candles" are white not gold. This one was for sale at an antique auction house for $500. *Cough! Cough! WHAT?!*
Well.. since it is worth that much, let's see how I can use it now shall we?
First thing I did was take off all the glass bowls and the globe. Then I taped it off to spray paint it white, so it would look a little more shabby-chic.
When it was white I went to reattach the crystals and realized that they looked terrible because each one was held on a by a tiny brass clip
I therefore removed all the brass clips, one by one, with a needle nose pliers.
It took me a little more than 2 hours. There are easily over 400 clips on this chandelier.
I then realized I was out of spray paint! OUCH. This is where my last $1.05 for the week comes in. I went to Home Depot and bought the El Cheapo white gloss spray paint and coated the clips.
Here is where it gets ugly. I didn't take note of how the crystals were attached to the chandelier! Big mistake! I only had those 2 grainy pictures I showed you above to go on. I was screwed. I also had removed the glass bowls and nearly 1/3 of the crystals hung off the bowls directly.
I decided to just make it up as I went along and slowly reassembled the crystals on the clips. I will say that the Quik Color paint didn't hold up very well to the pliers (although I doubt any paint over brass would) but it was okay. Anything was better than the brass clips:
I removed the old pineapple laden chandelier from the ceiling:
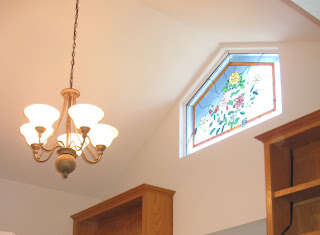
I am not quite sure that is Queen Anne style, but that is what they left me! You also can see I have an pink and yellow flowered stained glass window in this room. I figure that gives me carte blanche to make this my own girly room.
My new shabby chic chandelier fits right in. The cord is a little short because the ceiling in this room is lofted, but it is okay.

I think I may put the light on a dimmer in the future, but I am going to wait until the cabinetry is painted.

All in all it is a pretty big style change for a mere $1.05


What a big difference!! Isn't that sweet? when you spend that small amount of money for such a big change! just some elbow grease!
ReplyDeletehttp;//www.remodelandolacasa.com
What a great way to redo that light! It looks shabby beautiful ;o)
ReplyDelete